Wednesday, December 30, 2009

Slices: Lemon bars, Raspberry cheesecake brownies, Passionfruit slice and Spicy raisin loaf

I offered to cater dessert for my office Christmas party, and decided to do four slices. I decided to do this as they could be sliced into bite-sized pieces, and eaten without the need for extra cutlery.

slices

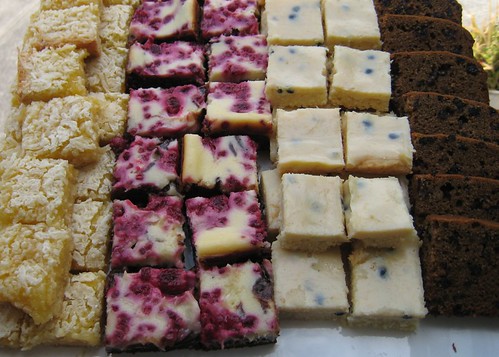
The slice second from the left is a raspberry cheesecake brownie, from the Taste website. I made it as described, but decided not to save some of the chocolate mix to dollop on top of the cheesecake mix. I also had to cook it much longer than the recipe said. This was probably my favourite of the 4 slices. So rich but so good!

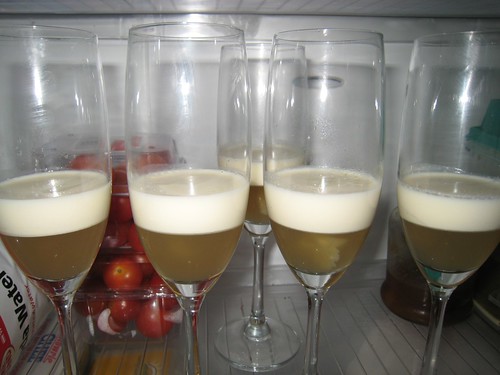
Second from the right is another Taste recipe, passionfruit slice. I've made it before and it's easy and impressive.

On the far right is my spicy raisin loaf. I made this to satisfy the fussy eaters who don't like overly sweet desserts!

Ingredients:
125g butter, melted
1/2 c golden syrup
1 c raisins (but I used currants this time)
1 tsp bicarb soda
3/4 c boiling water
1 1/2 c plain flour
2 tsp baking powder
1 tsp mixed spice
1 tsp ground cinnamon

Preheat oven to 180ºC.
Mix the butter, golden syrup, raisins and bicarb soda.
Add the boiling water and mix until all is melted and combined.
Sift in the flour, baking powder, spices and mix well.
Grease a 20cm loaf tin and line with baking paper.
Pour in the mix and bake for 1 hour.
Cool in the tin for 5 minutes then turn out onto a wire rack.


On the left are lemon bars. This is another recipe that I've been using for years, but I'm not very happy at how it turned out in my current oven. It's an older style and has an element on the bottom, so things don't get golden on the top as I am used to (and this slice looks and tastes much better when it's crispy and golden!). I can't fit these sorts of things under the grill... is it worth investing in a kitchen blow torch to finish things like this off?

Anyway, recipe below. Cardamon is the secret ingredient that really sets this recipe apart from your standard lemon slices!

Ingredients:
1 c softened butter
1/4 teaspoon salt
1/2 c caster sugar
2 c self-raising flour
4 eggs, lightly beaten
2 tbs lemon zest
5 tbs lemon juice
1/2 tsp freshly ground cardamon
2 c sugar
1/4 c self-raising flour
1 c shredded coconut

Preheat oven to 180ºC.
Blend butter, salt, sugar and 2c flour to make a soft dough.
Press into a 22x33cm pan lined with baking paper.
Bake 15-20 mins until golden.
Meanwhile, combine eggs, lemon zest and juice, cardamon, sugar, 1/4c flour and mix until smooth.
Pour over the baked crust.
Sprinkle coconut over the top.
Reduce oven to 160ºC and bake for 25 mins until firm.
Cool in the tin completely, then slice.

Tuesday, December 29, 2009

Donna Hay's prosciutto-wrapped turkey

I made this for Christmas lunch, for about the fourth year in a row. Yes, it's just that good! A previous housemate introduced me to the recipe (hi Bec!). I use the same ingredients with chicken regularly - it translates well to both breasts and whole roasts.

Ingredients:
100g butter, softened
2 tbs finely grated lemon rind
1 tbs sage leaves, chopped
2 cloves garlic, crushed
sea salt and cracked black pepper
2kg turkey breast or thigh roll, skin on
salt and pepper
15 slices prosciutto

Preheat oven to 200ºC.
Place the butter, lemon rind, sage, garlic, salt and pepper in a bowl and mix well to combine.
Rub the mix under and over the skin of the turkey and the meat.
Sprinkle with extra salt and pepper.
Wrap the prosciutto around the turkey, place on a greased rack in a baking dish and roast until the skin is golden and the juices run clear.
Rest the turkey for 15 minutes before carving.

I didn't get a photo of the finished product, but here's the turkey just after adding to the oven. Check out Donna Hay's website for a picture of the cooked product!

turkey

Monday, December 28, 2009

Margaret Fulton's french peas (petits pois française)

This was another dish cooked for Christmas lunch, from Margaret Fulton's Christmas cookbook. I have to admit that I was dubious about the inclusion of cooked lettuce in this dish, but it worked really well. This is a really unique and tasty way to cook peas for a special occasion.

Ingredients:
60g butter
2 rashers of bacon, diced
6 spring onions, finely sliced
6 outer lettuce leaves, shredded
1kg frozen baby peas
2 sprigs of mint
1 tsp sugar
salt and pepper
2 tbs water

Melt the butter in a large, heavy-based saucepan.
Gently fry the bacon and spring onion until soft.
Add the lettuce and stir over a low heat until bright green.
Add the peas, mint and sugar, and season with salt and pepper to taste.
Add the water, cover with a lid and cook over a gentle heat for 15-20 minutes, stirring regularly.

peas

Sunday, December 27, 2009

Cookbook challenge, week 6 (part 2): Christmas Trifle

This second recipe for the cookbook challenge comes from Margaret Fulton's Christmas cookbook. It's a great book with all manner of recipes that I'd happily cook all year round.

The trifle was made for the extended family lunch. I added home-grown berries from my parent's garden on the top layer - I'm not sure of the exact quantity, just enough to cover in a single layer.

Ingredients:
250g sponge finger biscuits
125g crushed amaretti biscuits
300g raspberries
3 mangoes, flesh cubed
1/2 c dry sherry
1/2 c apple juice
1 c whipped thickened cream
2 c custard
berries and mint to garnish

Lay slightly less than half of the sponge fingers in the base of a large glass serving bowl.
Sprinkle with the crushed amaretti.
Layer the raspberries over biscuits.
Scatter the mango over the raspberries.
Top with the remaining sponge fingers.
Combine the sherry and juice and pour over the fingers.
Cover and set aside for 30 minutes.
Gently fold the cream into the custard.
Spoon the mix over the fingers, allowing excess to drizzle down the sides.
Top with berries and a sprig of mint.

Trifle

I'm not a big trifle fan (had a bad incident with one as a child!) but this was really modern, fresh and clean-flavoured. I much prefer it to the traditional trifles with jelly and cake! I'm enjoying some leftovers as I type this... :)

Trifle

Thursday, December 24, 2009

My kitchen garden: update, week 3

Time for an update of the garden. It's three weeks since planting both sides.

The left-hand side is pictured below, and growing well. The tomatoes are really healthy, green and thick. A couple have started flowering already.
The nasturtium seeds took quite a while to sprout, but are now well on their way. I think they are going to look really nice edging the garden.
The beans also took a while, but are growing away heartily! I'll need to put up some sort of support/trellis for them soon.

I'll spread some more mulch around now that everything has sprouted.

The carrots seem to be a bit of a failure, unfortunately. The sprouts also took ages to appear, and seem to disappear as quickly. They're probably getting eaten by the snails. If things aren't looking up by the first week of January, I'll replant that section with something else.

Garden - left

The right-hand side of the garden is also generally doing well. The tomatoes are thriving and the snow peas are growing well. Some of my herb/lettuce seeds are sprouting. Incidentally, there's heaps of rocket appearing around the outside of both garden beds: bonus!

Garden - right

The basil isn't very happy, I was worried that might happen. It's yellowish and being eaten by some pest.

Garden - sad basil

I've got some black russian seedlings given to me by a workmate, who grew them to see if the seeds were viable (yep!). I'll transfer these into large pots or the garden soon.

Garden - black russian seedlings

My rosemary and sage plants are below, I've had these for a while and use them regularly in cooking.


Garden - rosemary
Garden - sage

Finally, some other pots that I'll plant out between Christmas and New Year. They were a bargain: 10 strawberry seedlings for $10, and 5 'potted colour' for the same price!

Garden - strawberries and flowers

Merry Christmas!

Tuesday, December 22, 2009

Cookbook challenge, week 6 (part 1): Avocado and cherry tomato wonton cases

This week's theme is Christmas, and boy-o-boy am I cooking a lot for the season this year! I hosted a dinner party, am catering dessert for my work function, and cooking a couple of dishes for the extended family's Christmas Day lunch.

I'll post a couple of the recipes as I cook them, but this first one is from the dinner party, served as an appetiser. I chose it because of the red and green colours - very Christmassy! It was published in the Good Taste magazine in December, 2007.

Ingredients:
Olive oil spray
36 Shanghai wonton wrappers
2 avocados, halved, stones removed, peeled, mashed
1/3 cup natural yoghurt
Tabasco sauce
250g punnet cherry tomatoes, chopped
2 tbs fresh lemon juice

Wonton cases

Preheat oven to 190°C.
Spray a mini muffin pan with oil to lightly grease.
Place 12 wonton wrappers in the pan and fold and press to line.
Bake for 8 minutes or until golden brown and crisp.
Transfer to a wire rack to cool.
Repeat for 2 more lots of 12 wrappers
Place the avocado in a bowl.
Add the lemon juice and yoghurt and stir to combine.
Add the Tabasco sauce to taste.
Combine the tomato in a bowl and season with salt and pepper.
Spoon the avocado mixture evenly among the wonton cups.
Arrange on a serving platter. Top with the tomato and serve immediately (if made too far in advance the cases will go soggy).

Avocado & cherry tomato salsa wonton cases

These were quite nice, and eaten pretty quickly! I think they could have done with a little more 'zing', and if I make these again I'll add more Tabasco sauce, or incorporate sweet chilli sauce instead. They certainly look festive and were very easy to make.

Monday, December 21, 2009

Milk and honey jellies

I found this recipe here on Kitchen Wench's website. The stunning photos have haunted me ever since I first saw them, and I finally got around to making them for a recent dinner party. I figured after a multi-course meal that they'd make a refreshing yet light and spectacular dessert, and they sure did!

Milk and honey jelly
Halfway through the refrigeration process

I won't repost the recipe - see the link above for details!

My alterations:
  • I used a smidgen more gelatin in each of flavours, just to be on the safe side.
  • I used that recipe to make 5 servings - I forgot to scale it up! So mine were slightly lower in the glass than they should have been, but it was ok - because my guests hadn't see how they were supposed to look ;)
  • I topped them with some grated dark chocolate.

The dessert is quite time consuming - it took over an hour for the first layer to set, and slightly less for each consecutive layer. All up the recipe took about 4 hours from start to finish. It's long but not arduous - and it's also a perfect recipe to make a day ahead, that way you don't have to do as much on the day of the dinner party! I took the jellies out of the fridge before my guests arrived and they were a perfect temperature by the time we got around to dessert.

My finished product is below - ugh, bad picture. I forgot to take photos before my guests arrived, and by the time I remembered as I was serving them, I had a few wines under my belt!

Milk and honey jelly

Cookbook challenge, week 5: Fried haloumi with mint and lemon

I'm up to my ears in cooking at the moment (dinner party and Christmas posts coming soon!) and so for this week's challenge (posted a day late!) I chose something simple. The theme was Greek and this recipe is from Good Taste magazine (April 2006) and can also be viewed here, so I won't repost the recipe. I made a much smaller batch though - 500g of haloumi as listed in the recipe is heaps! I used about 100g of the cheese. I also chose not to drizzle with oil after cooking - I just don't think the extra oil is necessary.

Fried haloumi with mint and lemon

This was AMAZING. Probably the tastiest thing I've cooked for the challenge so far! The simple, fresh flavours of the lemon and mint shine, and it's incredibly addictive.

It's the first time I've dredged haloumi in flour before frying, and it makes a very positive difference: the resulting cheese has a lovely crispy exterior. I'll definitely include this step when cooking haloumi in the future!

Check out the other entries for the Greek theme here.

The next theme is Christmas, of course!

Sunday, December 20, 2009

Little Salama, CBD

Little Salama is on Harrington St, and it's a somewhat recent discovery for me. It's quite a small place, but serves tasty, fresh food.

This is the lunch box with felafels ($9), with hummus and sweet chilli sauce. There are also carnivorous versions, or kebabs available. This lunch box is pretty tasty, and relatively healthy too.

Little Salama

Friday, December 18, 2009

Foodie flags!

This is pretty clever - Flags made from food. I could pick almost all of the countries!

Tuesday, December 15, 2009

Recent eats: Jam Packed and Vanny's Cafe & Takeaway

Jam Packed is a popular cafe in the Hunter Street IXL Jam Factory complex. As well as tasty food, it also sells an interesting range of kitchenware, gourmet products and sweets.

I had the 'Open Bacon Sandwich with basil pesto tomatoes, avocado & house relish' ($15.50). All our choices were tasty and filling, but not cheap - although the prices aren't surprising considering the location. They have a unique selection of smoothies available - check them out here.

Jam Packed - Open Bacon Sandwich

Vanny's Cafe & Takeaway is situated on Liverpool Street, opposite Spotlight. It's a popular lunch choice for many of my workmates, and the food is consistent and great value. Pictured below is a chicken satay buried under lots of tasty peanut sauce, with fried rice and salad ($8). I usually skip the chilli sauce!

Vanny's - chicken satay etc

Thursday, December 10, 2009

Cookbook challenge, week 4: butter bean dip

The theme for week 4 was beans, and I struggled a little with this one! I'm pretty fussy with the type of beans that I like: I can't stand whole, squishy beans in dishes like baked beans, chilli, etc. I also don't like broad beans. However, I adore fresh, whole green climbing beans.

I planned to make a recipe from a Jamie Oliver cookbook, which was a green bean salad. These plans were foiled when the 3 shops I went to didn't have any beans - quite surprising, considering they are in season right now! Out of desperation, I grabbed a can of butter beans and hoped I could find a nice recipe. The can itself had a decent sounding recipe for a dip that sounded similar to hummous, so I was hopeful.

Stephanie Alexander came through with the goods, found in the cooking bible - The Cook's Companion. The recipe is for a white bean purée, using dried cannellini or haricot beans. I adapted it slightly to suit the tinned beans, and my resulting recipe is below.


Ingredients:
1 tin butter beans (I used La Gina brand)
1/4 cup cold water
1 tablespoon tomato paste
1 tsp chopped garlic
1 tsp finely chopped fresh rosemary
extra-virgin olive oil
1/4 cup hot chicken stock (I used a single stock cube, and so extra salt was not required. If you use real stock, taste-test to see if you need to add more salt)
Juice of half a lemon
Freshly ground black pepper

Drain and rinse the beans.
Place in a food processor with the tomato paste and water, and purée the mixture well.
Sauté the garlic and rosemary in a little oil.
Add purée, stock and lemon juice and mix well over medium heat.
Continue cooking and stirring regularly until the purée thickens.
Season with pepper (and salt if required).

Butter bean puree

I was quite prepared not to like this, but it's actually very tasty and moreish! It's really cheap to make - basically just the cost of the tin of beans, and has a really genuine flavour, much better than supermarket dips.
It's quite garlic-y, so use less if you are sensitive to garlic.

Stephanie recommends this recipe as a sourdough topping or alongside grilled quail or vegetables. I had some alongside my simple dinner pictured to the right - a chicken schnitzel, grilled asparagus and tomatoes, and fresh avocado, snow pea shoots and mushroom. It was fantastic, and complimented the dish surprisingly well!

Simple dinner

Next week's theme: Greek

The week with two cakes

Birthdays = cakes!

Flourless chocolate and pecan torte, based on this recipe. Soooo very rich, but delicious. Great for gluten intolerant people - and chocaholics! I made this in a bit of a hurry, and used the freezer to cool it rather than allowing it to cool slowly on the bench, which meant that the insides were a bit soggier than they should have been. If I make it again I'll either cook it a bit longer or be more organised to allow it to cool on the bench for longer.

Flourless chocolate and pecan torte

Passionfruit cheesecake, made from this recipe. I didn't photograph it very well, but this was suberb - nice and tangy and not too sweet. I used Lattice biscuits for the base.

Passionfruit cheesecake

Tuesday, December 8, 2009

Cookbook challenge, week 3: Sesame prawn toasts

The theme for the second week was hor d'oeuvres (I always have to think about how to pronounce that word!). I chose a recipe from a little bonus booklet that came with a Delicious magazine.

I'm a big fan of Delicious - great recipes and lots of eye candy. I subscribed to it for about 3 years, but ended the subscription when taste.com.au came onto the scene - it was much easier just to browse through the recipes there! I will always keep and re-read my old magazines though.

The booklet is called ABC Delicious Menus: 70 essential recipes for stress-free entertaining. It has about 10 cuisine themes with a bunch of recipes for each that you could use to plan a dinner party. I'm thinking about using the Turkish one for a dinner next week.

The sesame prawn toast recipe is from the Asian section. I love prawn toast!


Prawn toast, pre-slicing and frying
Ingredients:
6 large green prawns, peeled and deveined
100g smoked salmon
4 slices thick white bread
3 tbs sesame seeds
Vegetable oil, for shallow frying
Snow pea sprouts, to garnish

Place prawns and salmon into a food processor, season, then process to combine.
Spread the mixture onto the bread.
Cut off the crusts, then cut into quarters.
Put sesame seeds on a small plate, and dip the prawn mix into the seeds to coat well.
Heat 2cm oil in a frying pan over medium-heat. Test the oil with a cube of bread (the discarded crusts are useful for this) - it should turn golden in 30 seconds.
Fry the toasts for 1 minute on each side until nicely golden.
Drain on paper towel.
Garnish and serve.

Sesame prawn toasts

The finished product! These were really, really tasty - but aren't most fried foods? :) The mixture was nice - the original recipe specified smoked trout, but I couldn't find this. Interestingly, by the time you peel the prawns you end up with more fish than prawn, by weight!

The next cookbook challenge theme: beans

Wednesday, December 2, 2009

My kitchen garden

The house that we just moved into doesn't have a garden at all, which is a big change from my previous house, which had a lovely, huge (and very high-maintenance) cottage garden. I'll miss that garden!

However, a happy discovery when we moved in was that there is a vegie patch. When we inspected the house it was a thick, dense tangle of weeds and we had no idea that this was hidden underneath.

I've started planting some vegies and herbs - I really enjoy growing my own produce, albeit at a more limited scale than I'd like. One day I'll have a big vegie patch of my very own, but this will do for now :)


This picture (click to enlarge) shows what I planted in half of the vegie patch a week ago. There are four tomato seedlings that my parents gave me as a housewarming present (thanks!), including the Black Russian heirloom variety, which is a favourite of mine.
The dark green is where I planted climbing bean seeds, and I'll add a trellis or some sort of support once they get bigger.
The dark orange strips are where I planted carrot seeds.
Light orange is where I planted nasturtium seeds, as an attractive border and to use in salads.


I planted up the other side of the garden last night. This side has a cherry and grape tomato on the left.
Below the 'teepee' of stakes are snow pea seedlings. I started tying some plastic tubing onto the stakes for the seedlings to use as support, and as they grow I'll add more support higher up the stakes. I might actually change the stake arrangement as last time I used a teepee shape, my peas grew far too tangled and thick at the top.
Basil seedlings are planted front-left - I don't have a lot of luck with basil, but we'll see how they go. And in the bare spots in between are somewhat dense patches of seeds of thyme, parsley, and a few salad leaf varieties. If they're successful, I'll thin them out or relocate them.

Not pictured are some peat pots that I have also seeded, if they grow I'll plant them in the back of this garden or into large pots.

The challenges of this vegie patch:
  • The quality of the soil. It looks ok-ish, but it's hard to tell. I mixed some manure fertiliser through the left side of the garden, and both sides have lucerne mulch. I'll probably fertilise the garden when the tomatoes start flowering.
  • Snails and slugs! Thousands of them! I can't believe how many there are. I've spread snail bait and it seems to be working, and I'll just have to keep that up and cross my fingers for the sprouting seeds.
  • The next door neighbour's cat: it appears this patch has been a convenient bathroom for him. He's so far favoured the right hand side, so I've put the mini fence up to try and keep him off it, as well as leaving the dirt patch at the back accessible so could use that instead. I haven't seen him use or walk on the lucerne at all yet - maybe that is enough of a deterrent?

I'll keep this blog updated with the progress of my garden!

Simple pleasures

Nibbles

Just a nice, simple platter that we enjoyed with a glass of wine.
We sat outside to celebrate the first evening of nice weather that we've had in the past week or so.

Strawberries, antipasto mix, cracked pepper crackers and a Heidi Farm blue.

Monday, November 30, 2009

Cookbook challenge, week 2: Tandoori lamb cutlets with cucumber salad

The theme for week 2 is Indian - one of my favourite cuisines! A couple of years ago I attended an Adult Education cooking course on Indian cookery, and it was fantastic. It was taught by a lady who used to run one of my favourite Indian takeaway shops in town.

From that course I learned a great range of recipes and techniques for Indian cooking. There are several dishes that I still cook regularly, and will no doubt post sometime! I really like authentic Indian dishes, both when cooking at home and eating out. The more ingredients, the better! Using a wonderfully large range of individual spices provides a far superior outcome to any packet or jar mix, and it's much easier and faster than I think a lot of people might expect. There are some good mixes and jars around for those times when you don't have the motivation, though; I'm partial to the Patak's range.

For this challenge, I chose a recipe from the AWW's Great Barbecue Foods. Unpacking at the new house is still in progress, and at this stage I still hadn't uncovered all my recipe books! The alternatives were some 80s Microwave cookery books, and another really retro one - they were printed long before proper Indian food became popular in Australia, and hence don't contain anything vaguely authentic. I think the closest thing I found was a curry using the old favourite Keen's curry powder :) I hope to use some of the older cookbooks in future challenges... this could be interesting!

The recipe I chose was 'Tandoori lamb cutlets with cucumber salad'. It's a very basic recipe, but was still pretty tasty and got two thumbs up from my partner, J. I halved the original recipe, to serve 2. I also left out the onion specified in the original recipe as we didn't have any.

Ingredients:
6 lamb cutlets

Marinade:
100g yoghurt
1 garlic clove
1 tbs fresh ginger
Juice from half a lemon
1/2 tsp chilli powder
1 tsp garam masala
1/2 tbs sweet paprika
1 tsp ground cumin

Blend the marinade ingredients, then combine with the lamb cutlets and stir well to coat.
Refrigerate for 3 hours.
Cook on a heated, oiled barbecue until browned both sides (I used the grill in our oven as it was raining!)
Serve with cucumber salad and coriander yogurt.

Cucumber salad:
1 cucumber
1 fresh red chilli, finely diced
30mL peanut oil
Juice from half a lemon
1/2 garlic clove, crushed
1 tsp cumin seeds, toasted
1/2 tbs fresh mint, finely shredded

Peel cucumber with a vegetable peeler.
Place in a clean teatowel and squeeze out excess moisture
Toss gently with remaining ingredients

Coriander yogurt:
1/4 cup fresh coriander leaves, roughly chopped
100g yoghurt

Blend until combined.

The finished product! As you can see, I really need to work on my serving/presentation skills. It's not something I've really thought about very much before, but now that I am taking pictures for all to see, I should start thinking about it soon!

The meat was fantastic. The marinade had a very tasty flavour. If anything, I'd add more chilli to give the cutlets some more zing. I'll probably make this again, but with a more economical cut of lamb (the cutlets were $2.50 each).

The cucumber salad was great. Very fresh and vibrant tasting, it'll be a good one for summer. I'd like to try it with sesame oil instead of peanut - I think sesame has a much nicer flavour (and it will probably require less oil too).

I served the dish with some roasted potatoes and pumpkin tossed in olive oil, garam masala and paprika.

The theme for week 3 is hor d'oeuvres. I'm going to a picnic on Saturday, so my friends might be the guinea pigs for the next recipe!

Friday, November 27, 2009

Ciuccio, Salamanca Square

On the first Friday of every month, a bunch of friends and I head to a randomly-selected restaurant for a big group dinner. It's a great way to check out a new place (we try to head to places we haven't been yet), and see a lot of the menu at the same time, as we all have quiet different tastes. In October, we went to the new-ish Ciuccio, in Salamanca Square.

I really enjoyed my meal here. We had fantastic service - our waiter was very professional and efficient, yet friendly. Drawing with the provided crayons on the butchers paper-lined table is fun!

Pizza at Ciuccio

I had the Pollo con Pesto pizza (pictured) which was delicious, wonderfully garlicy. Their pizzas are woodfired, quite big, nice thin crust. I also tried the Abruzzese (I think) and the Insalata di rucola, both just as good.

The Calzone and Fettuccine alla Vodka looked great, although the pasta was apparently very tomato-ey (almost too much) and very filling.

If you are in the mood for great Italian, especially pizza, Ciuccio is a great option (one of many!) in the Salamanca area.

Ciuccio on Urbanspoon

Singapore Chilli Crab

Island Markets are located in Derwent Park and although there are plenty of junk stalls to try and avoid, there's also a great fish market in the complex. I've set myself a challenge, where everytime I go there I buy some sort of seafood that I haven't cooked with before, and experiment with it.


Blue swimmer crab was my first experiment. I bought two, and they were approximately $5 each. I decided to try the classic Singapore Chilli Crab, based on this recipe (halved). Preparing the crab was much easier than I expected - everything comes apart pretty cleanly, and the recipe was quite easy. I omitted the sherry, as I didn't have any.


The finished product was AMAZING. The sauce was just so, so tasty - finger licking good! (and it literally was - it's quite a messy dish to consume). The crab meat was lovely and sweet, but also quite tricky and a bit frustrating to extract. I'll definitely make this recipe again, but use just pure crab meat (if I could find some decent quality stuff), or substitute with prawns instead, to make it easier to eat! I also think that the recipe uses far too much spring onion, so I'll halve the amount specified. Otherwise, it's perfectly delicious!

Wednesday, November 25, 2009

Pasta Resistance, CBD

I tried the franchise (I think) pasta shop, Pasta Resistance, this week. It's on Collins St, next to the Chickenfeed exit.

I had a two-for-one voucher, so ordered two different meals: firstly, 'Spinach and ricotta ravioli', served with a tomato and mushroom sauce. This was ok, but nothing special. My pasta was a just a little bit too al dente, and they were quite large - too big to be eaten in one bite (without risking tomato sauce stains!). Having to cut it first was a bit of a hassle. The ravioli filling was great though - you could clearly taste the ricotta.

The next day, I reheated my other selection, the 'Pasta Sicilian'. This was fantastic - wonderful fresh tasting and textured spiral pasta, with a tomato-based sauce containing olives, sun-dried tomatoes and mild pepperoni. I don't know if this was better because it had been left for a day, but it certainly was good!

All pasta is $7.50 each for a regular size (small and large are also available, as well as family-sized take home serves).

Their motto is 'Fresh pasta & homestyle sauces' and I think they live up to this, while being reasonably priced.

I'll head back sometime to try their 'Chicken Bogotoa' or one of their pasta salads.

Camembert update

My lovely (and stinky!) little camemberts have been riping away in a cool cupboard. Last night, 9 days after making them, I wrapped them in greaseproof paper and put them in the fridge to continue their ripening process more slowly.

They've developed a nice white fuzz and are squishy around the edges. In the next couple of weeks the squishy-ness should work it's way into the middle of the cheese. Ever purchased a soft cheese that was too hard and tasteless in the center? That's because it's too young. Leave it out of the fridge for a little while and it will soften up.

I'm looking forward to sampling my cheese, although to be perfectly honest I'm hoping they're ok - I'm not entirely sure! They are really quite pungent, and I hope this isn't a bad sign. They haven't had any black mould spots, which from my reading is the most common bad thing to happen, but there is a slight hint of orange. I'll keep an eye on them, and sample them cautiously ;)

Tuesday, November 24, 2009

Cookbook challenge, week 1: Lemon Cordial

The theme for the first week of the challenge was citrus. Lemon was an obvious choice for me - I'm moving house and my old place has a lovely lemon tree in the backyard that I wanted to take advantage of. Homemade lemon cordial is wonderfully refreshing and additive-free, and a good way to use up excess fruit.

This recipe comes from a special cookbook - that of my father's! It's not an official cookbook, but I'm hoping I can get away with it this week as my 'real' books are buried deep in moving boxes. I did try another recipe from a Marie Clair cookbook, a prawn and lemon risotto, which I'll post once I find the book.

My dad has compiled a bunch of fantastic recipes over the years. He's especially known for his jams, sauces and relishes, as well as a spectacular abalone lasagne. If I catch any abalone this summer, I'll post it!


Reg's Lemon Cordial
Makes approx. 3 litres

Juice and finely grated rind of 8 medium–large lemons (approx 400mls of lemon juice/rind)
2kgs sugar
25g tartaric acid
50g citric acid
2L boiling water

Put all dry ingredients and lemon juice into a saucepan, then add boiling water slowly.
Bring to a gentle boil, mix to dissolve, then cool.
Bottle, and store in the fridge.
Serve diluted with water or soda-water according to taste.


I quite like it with soda water and a dash of vodka - very refreshing on a hot evening!

For other posts on this week's theme, see this post. I really want to try Gluten Shmooten's preserved lemon recipe to put a dent in the remaining couple of kilos of lemons I bought with me to my new house. I'd also like to make some lemon curd, and I'm sure I have a recipe in one of my cookbooks (actually, probably several!) somewhere.

Week 2's theme: Indian. Time to find and unpack the recipe books!

Monday, November 23, 2009

Salt, Moonah

We visited Salt for a Sunday brunch - it wasn't our intial choice, as our preferences were either full (Jackman & McRoss) or closed (Grubb).

No pictures, unfortunately - it completely slipped my mind! The food was beautifully presented and service was friendly and efficient, with one minor quibble - we were told that there was no orange juice available, but there were several varieties of orange-based Charlie's juices in the fridge.

I had the duck and soba noodle salad. The pieces of duck were fantastic - tender and with a beautiful flavour. The salad itself was enjoyable enough, but lacking in a bit of seasoning or bite, I think. Some finely diced red chilli would result in an outstanding dish. Still, it was very tasty and quite a healthy choice for a weekend brunch.

I also sampled my lunchmate's dishes. The fish cakes were soft and nicely fishy, although they fell apart quite easily. The accompanying mint and cucumber salad was refreshing. The prawn and chicken nasi goreng was very moreish - I'd go back to order this myself!
Not sampled, but thoroughly enjoyed by my remaining dining companions, were the steak sandwich, which was a very generous serving, and the Moroccan (?) breakfast.

Our meals were in the range of $15-$20, which seems a little pricey for Moonah, until you taste the quality of the food.

Recommended as a place to find tasty, interesting food, and one of the best in the area.

p.s. I've still got my first Cookbook Challenge recipe to post. Moving house + no internet at home for several weeks = a very disorganised me!

Monday, November 16, 2009

Cookbook challenge: a recipe a week

I spotted this one of the blogs I read (off the spork) and thought it sounded like a fantastic idea. There are plenty of blogs around that are themed, or following some sort of pattern (and become inspiration for books and/or movies, such as Julie and Julia!). As as side note, my favourite 'themed' blog is Alinea at Home, where the author is cooking her way through a mind-boggling range of recipes.

For a new blog writer, a theme or a challenge can be a great way to keep motivated and posting regularly.

So, as well as other random food-related posts, I'll be posting a recipe a week based on the idea that you can read here. I have quite a collection of recipe books, but don't use them very often - I'll browse them, but if searching for a recipe I tend to take the easy option of finding something online (www.taste.com.au is so very handy). This challenge will kill two birds with one stone (poor birds, by the way!) - regular posts, and using my recipe books more.

The first week's theme is citrus, and I'm looking forward to picking a recipe!

Photography

Most of my cooking shots are taken using my Canon IXUS 850IS. I'm a huge fan of Canon point-and-shoot digital cameras, and this has the added bonus of a relatively large amount of control over manual settings.

The rest of my shots are taken with the camera in my mobile phone, which is a Sony Ericsson C902. It takes pretty decent shots for a mobile phone.

As times goes on, I hope to remember to carry my proper camera more regularly, and avoid using my phone except in desperate circumstances.

And eventually I'll get myself a digital SLR, and use that for the majority of my photos. Time to start saving!

Camembert workshop

Yesterday I attended an Adult Education course, called Camembert Workshop, in Woodbridge. It was taught by Nick Haddow, of Bruny Island Cheese Co. fame, and he was assisted by Christine Worley.

Adult Ed courses are great. I've done a number of them over the years, and enjoyed each thoroughly. They aren't cheap, but cost cover materials and are definitely a worthwhile investment. I've refined my cooking skills in Japanese, Thai and Indian cuisines, to name a few!

Classes can be browsed on the Adult Ed website. Classes are updated quarterly and fill up pretty quickly - keep an eye out for the quarterly updates.

Nick Haddow was a great teacher. Extremely passionate, entertaining, and patient - he happily and respectfully answers all questions asked of him. I was a big fan of his cheeses before the class, and I'm now a fan of him as well!

In yesterday's course we learned how to make raw milk camembert (pasteurised is also an option, but I don't think anyone did this) over a period of 6 hours. I won't post the details here - sign up for one of the classes to learn the process yourself :)

Here's Nick pouring off the whey from the curds:


The curds are we what use to make the camembert with. We also used the whey: the addition of vinegar, salt and heat transformed this murky yellow liquid into warm, delicious ricotta. You expect fresh cheese like this to be good, but it exceeded my expectations by far! It was soft, salty and comforting. Given the chance, I'd happily eat it by the spoonful, but it would also be fantastic over pasta, or sweetened with jam and served on thick sourdough toast.

I took home a little sample of the ricotta, plus 6 camembert cheeses in plastic molds:

Cheese babies

Tonight I'll remove the camembert from their molds, wash them in a brine solution, then they'll sit and develop a crust and white fuzz on the outside and soften inside. I hope to have some great cheese ready in a few weeks - just in time for Christmas!

Stay tuned for updates :)

The post in which I introduce this blog

What do you write in the very first post on a new blog? I'll try to keep it short and sweet!

I love reading food blogs (actually, lots of different blogs but food blogs especially), and decided to create one of my own to document the food I eat and cook. Hobart has several fantastic food blogs, but I think there's always room for more to be posted about the Hobart (and Tasmanian) dining scene.

I've also set myself a cooking challenge in 2010 - see here for the challenge posts.

I'm by no means a professional cook and haven't had any training. I've got lots to learn and I have fun experimenting with new cooking techniques and flavour combinations, and I get a buzz out of cooking for other people. And of course, I love eating out and do so as much as I can. I don't 'review' restaurants here as I don't really have the experience or knowledge to do so properly, and I'm not much of a writer, but I do like share photos of the delicious (and not so delicious!) food I encounter.

Welcome, enjoy the view :)